Fabric Face Mask Tutorial shared by Vanessa Van de Putte, Dixie Flag and Banner Co.
Fabric Mask Tutorial
Materials needed:
Fabric needed: Tightly woven, high quality, preshrunk cotton material which would withstand heavy,
frequent, high temperature laundering with disinfectant use such as chlorine bleach and autoclave conditions (steam under pressure).
The instructions create a double layered mask with an opening on the inside of the mask for an
insertable, exchangeable filter. This mask is similar in appearance to a standard surgical or barrier mask.
When these masks are being made by volunteers or in non-healthcare manufacturing facilities,
those constructing the masks must adhere to the principles of enhanced hand hygiene and
social distancing as recommended by the CDC, the federal Coronavirus Task Force and the
Texas Department of State Health Services—guidelines are attached.
When using masks constructed by volunteers or non-healthcare manufacturers, the health
care worker (HCW) or person receiving the mask for use are instructed to launder under high
temperature with detergent and disinfectant, and ideally sterilize the mask prior to initial
use.
Materials:
• 1 piece of 15” x 7.5” fabric
• Interfacing: 906F fusible sheer-weight interfacing 7”x7” –we tested for permeability with and
without the interfacing and found that placement of this polyester interfacing decreased
permeability.
• For the metal nose piece: 1/8” x 6.5” piece of malleable aluminum. Alternatively, you can use a
heavy-duty twist tie, larger gauge beading wire or pipe cleaner 6-7” long.
• Fabric tie mask: 2 pieces bias tape/seam binding .” x 40” (ties).
• Elastic ear loop mask: 2 pieces 9.75” (1/8” to .” elastic or durable rope elastic)
This is the original pattern. We believe it would may be advantageous to have a thicker cotton denim
type material on the outside and a softer, more comfortable fabric on the inside.
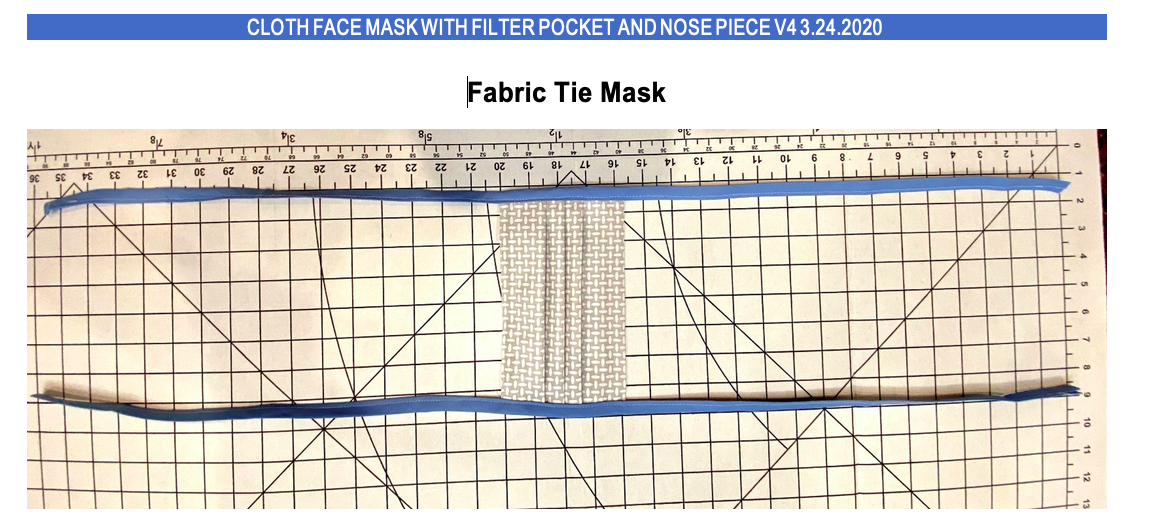
1. Cut fabric 15” x 7.5”
2. Fuse a piece of polyester interfacing to the back side of what will be the most anterior layer of the
mask.
3. Serge or zigzag stitch the short edges
4. Fold right sides together--short edges together
5. Mark 1.5" from sides to leave opening for filter gap
6. Sew the edge closed to the mark on both sides (1/4” seams)
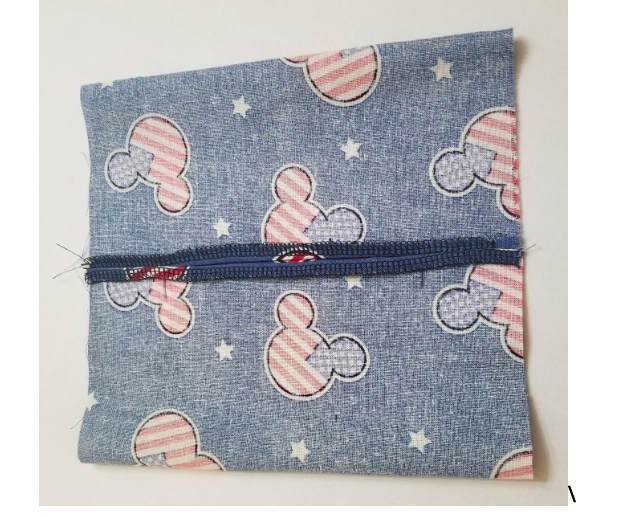
7. Press open seam. You will now have a "tube" with the opening in the middle of the seam.
8. Flip right side out and top stitch down both sides of gap. Be careful to not catch the rest of the fabric
in your top stitching
9. With the front of the mask on your surface, fold the top of the long edge down .”.
10. Fold and press 1/2" down to make wire tube. Stitch down and all around the square, leaving an
opening to put in the wire.
11. Add the wire/metal nose piece, and stitch it closed.
12. Make 3 pleats: pin, press, and sew. The pleats should be facing upwards on the back of the mask.
13. Apply bias to both short sides to make the ties: cut two 40” pieces of .” bias tape. Pin bias tape to
sides of mask with approximately 16” extra bias tape coming off the sides for ties. Top stitch the length
of the bias tape. The ties should measure 16” coming out of each corner.
14. Pleats should be facing downward on the front side of the mask.
15. The end user can insert an exchangeable filter in the pocket. We have tried several options (dense
polyester batting, HEPA filter, autoclave fabric), but have no firm recommendation on material at this
point in time. We also recommend placement of a 7” long piece of vinyl or water resistant tape over the
top of the mask (so that it covers the edge) on the top and bottom of the mask to prevent wicking of
fluid from the outside to the inside of the mask if it becomes very wet.
If you are making an elastic ear loop mask then after step 12:
13E. Cut two pieces of 1/8” to .” elastic or durable rope elastic to 9.75” long.
14E. Cut two bias strips 4.75” x 2”. Iron fabric cut for bias in half, and then in half again to create the bias
pieces.
15E. Pin or clip bias piece of fabric to both sides and stitch down (difficult to describe, see video if
needed). Make sure to leave open channel for elastic straps.
16E. Use a safety pin to guide the elastic through the side channels.
17E. Tie elastic and pull the knot into the channel.
This work is the result of a collaboration of experienced sewing enthusiasts, surgeons, nurses, engineers,
volunteers, and basic scientists from South Texas. The original mask design was based on a design from
the Easy to Sew YouTube Channel. Iterative design changes driven by input from subject matter experts
increased the
performance of the original design. This process improved the masks permeability characteristics and reduced wicking across the bridge of the nose and bottom of the mask. These masks are untested in clinical and standardized laboratory settings, and ideally should only be used in low risk settings. We believe the design improves on the material limitations of a traditional cloth mask. For HCWs, at least once daily in-hospital or industrial laundering is another precaution we recommend. For lay people, we recommend daily high temperature, machine laundering with detergent and a disinfectant such as chlorine bleach. Hand hygiene should be used before and after handling the mask. Masks should be handled from behind by the straps to avoid touching the front of the mask before and after use.
Currently, we do not recommend these masks if commercial grade barrier masks are available; however, we are being pro-active in order to provide an alternative should such masks become unavailable. The surgeons involved in this collaboration would feel comfortable using these masks for personal protection, and the protection of their patients, but we are also working with our infection control specialists and other experts to conduct quality control testing before recommending their use.
We are continuously working to iteratively improve mask performance and are currently testing filters for use in this mask. We have much work and testing to do. We consider this open source, and we welcome feedback.
Contributors: Easy to Sew YouTube Channel, Amita Shah MD PhD, Helene Perez MS, Erika Brigmon-Ibarra MD, Matthew Brigmon MD, Elaine Rich PhD, Tommye Austin PhD, Sherri Stewart, Elizabeth Stewart, Mary Stewart, Ronny Stewart MD, Jan Patterson MD and many others across South Texas and the Internet.

Materials needed:
• Fabric needed: 1 piece - 15” by 7.5” (this is the main piece of fabric for the mask). Fabric should be a tightly woven, high quality, preshrunk cotton material that can withstand heavy, frequent, high temperature laundering with disinfectant use such as chlorine bleach and autoclave conditions (steam under pressure)
• Interfacing: 906F fusible sheerweight interfacing 7”x7” –we tested for permeability with and without the interfacing and found that placement of this polyester interfacing decreased permeability.
• Aluminum wire (see below) 1/8” x 6.5” (Nose piece)
• For fabric tie mask: 2 pieces bias tape/seam binding ½” x 40” (ties)
• For elastic loop tie mask: 2 pieces 9.75” (1/8” to ¼” elastic, or durable rope elastic) AND 2 pieces 4.75” by 2” (this is used to make two bias pieces for the sides of the mask)
Supplies for fabric tie mask:

Supplies for elastic ear loop mask:

Directions:
Step 1: Cut Fabric 15” x 7.5”
Step 2: Fuse a piece of polyester interfacing to the back side of what will be the most anterior layer of the mask.

Step 3: Serge or zigzag stitch the short edges

Step 4: Fold right sides together with the short edges together
Step 5: Mark 1.5” from sides to leave opening for filter gap
Step 6: Sew the edge closed to the mark on both sides (1/4” seams)

Step 7: Press open seam. You will now have a “tube” with the opening in the middle seam.
Step 8: Flip right side out and top stitch down both sides of gap. Be careful to not catch the rest of the fabric in your top stitching

Step 9: With the front of the mask on your surface, fold the top of the long edge down 1/2”.

Step 10: Fold and press 1/2” down to make wire tube. Stitch down and all around the square, leaving an opening to put in the wire.

Step 11: Add the wire/metal nose piece, and stitch it closed.

Step 12: Make 3 pleats: pin, press, and sew. The pleats should be facing upwards on the back of the mask.


For fabric tie mask:
Step 13: Apply bias to both short sides to make the ties: cut two 40” pieces of ½” bias tape. Pin bias tape to sides of mask with approximately 16” extra bias tape coming off the sides for ties. Top stitch the length of the bias tape. The ties should measure 16” coming out of each corner.

Step 14: Pleats should be facing downward on the front side of the mask.
Step 15: The end user can insert an exchangeable filter in the pocket. We have tried several options (dense polyester batting, HEPA filter, autoclave fabric), but have no firm recommendation on material at this point in time. We also recommend placement of a 7” long piece of vinyl or water resistant tape over the top of the mask (so that it covers the edge) on the top and bottom of the mask to prevent wicking of fluid from the outside to the inside of the mask if it becomes very wet.

For elastic ear loop mask:
Step 13E: Iron fabric cut for bias in half, and then in half again to create the bias pieces

Step 14E: Pin or clip bias piece of fabric to both sides and stitch down. I turned the edges over as shown and sewed straight down each side.

Step 15E: Fold over the bias and top stitch close to make casing to hold the elastic


Step 16E: Insert elastic thru the casing made. (I used my useful purple thing to pull the elastic thru here, you can use a safety pin here too.)

Step 17E. Match ends of elastic and tie a knot. Rotate elastic so that knot is inside the casing and not showing. Repeat steps 13E-16E for the elastic on the other side.


Placement of a 7” long piece of vinyl or water resistant tape over the top and bottom of the mask reduces wicking of fluid from the outside to the inside of the mask if it becomes very wet (not pictured).
When these masks are being made by volunteers or in non-healthcare manufacturing facilities, those constructing the masks must adhere to the principles of enhanced hand hygiene and social distancing as recommended by the CDC, the federal Coronavirus Task Force and the Texas Department of State Health Services—guidelines are attached.
When using masks constructed by volunteers or non-healthcare manufacturers, the health care worker (HCW) or person receiving the mask for use are instructed to launder under high temperature with detergent and disinfectant, and ideally sterilize the mask prior to initial use.
This work is the result of a collaboration of experienced sewing enthusiasts, surgeons, nurses, engineers, volunteers, and basic scientists from South Texas. The original mask design was based on a design from the Easy to Sew YouTube Channel. Iterative design changes driven by input from subject matter experts increased the performance of the original design. This process improved the masks’ permeability characteristics and reduced wicking across the bridge of the nose and bottom of the mask. These masks are untested in clinical and standardized laboratory settings, and ideally should only be used in low risk settings. We believe the design improves on the material limitations of a traditional cloth mask. For HCWs, at least once daily in-hospital or industrial laundering is another precaution we recommend. For lay people, we recommend daily high temperature, machine laundering with detergent and a disinfectant such as chlorine bleach. Hand hygiene should be used before and after handling the mask. Masks should be handled from behind by the straps to avoid touching the front of the mask before and after use.
Currently, we do not recommend these masks if commercial grade barrier masks are available; however, we are being pro-active in order to provide an alternative should such masks become unavailable. The surgeons involved in this collaboration would feel comfortable using these masks for personal protection, and the protection of their patients, but we are also working with our infection control specialists and other experts to conduct quality control testing before recommending their use.
We are continuously working to iteratively improve mask performance and are currently testing filters for use in this mask. We have much work and testing to do. We consider this open source, and we welcome feedback.
Contributors: Easy to Sew YouTube Channel, Amita Shah MD PhD, Helene Perez MS, Erika Brigmon-Ibarra MD, Matthew Brigmon MD, Elaine Rich PhD, Tommye Austin PhD, Sherri Stewart, Elizabeth Stewart, Mary Stewart, Ronny Stewart MD, Jan Patterson MD and many others across South Texas and the Internet.